Flashing new bootloader to Woodpecker CNC
Not so long ago I’ve managed to corrupt my bootloader in woodpecker board by silly mistake. I’ve downloaded binary firmware (to back it up) with chosen ATmega2560 instead of ATmega328P – since it has more memory, dump was too big to fit later in 328p and when I wanted to restore it, I’ve overwritten bootloader. Interesting thing – firmware was still working ok. Anyway since I anyway wanted to upload newer bootloader no harm done. Just needed to find proper way to connect to the board.
 Woodpecker is quite old (but still sold), Chinese board for CNC machines. It has three sockets for pololu motor drivers, spindle and laser connection etc. It’s quite ok for starter. But it uses ancient GRBL 0,8 or 0,9, and has old Arduino bootloder. Changing GRBL is quite easy – just use avrdude and upload hex grbl file. You have to start upload just right, after powering the board with USB – otherwise it won’t connect to bootloader (unless this was in my case).
Burning new bootloader is bit more tricky. You need AVR programmer (or another Arduino board) and you have prepare some cabling, perhaps do a tiny soldering. But in exchange we gain more responsive and easier to connect to bootloader, and more memory in ATmega328P.
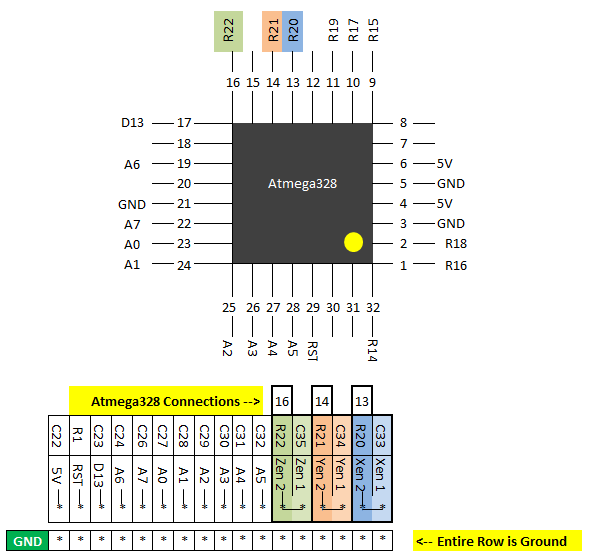
Really helpfull here was drawing (on the right) already made by rseijo on GRBL git issue forum. As you can see, on it, almost all connection are available on bottom pin row. But despite this, in some posts I saw people soldering connection directly to chipset – this should be last resort, and there are usually better ways.
The only thing that remained was to find Arduino 11 pin (PB3), and this happens to be pin used to PWM spindle motor. Here is small discrepancy. I have Woodpecker board 0.9 (like the one used to draw schematic on the right picture), but it looks like newer one (or just different) since mine instead of one “Z endstop (Zen)” connection has connected there ping 15 of ATMega chipset (this is Arduino pin 11). This could have been changed, because recently there are cheap, Chinese devices with exchangeable spindle and laser modules. And for this we need unmodified/unboosted PWM/TTL signal for laser. I’ve already used this pin to connect my laser, and you can read more here.
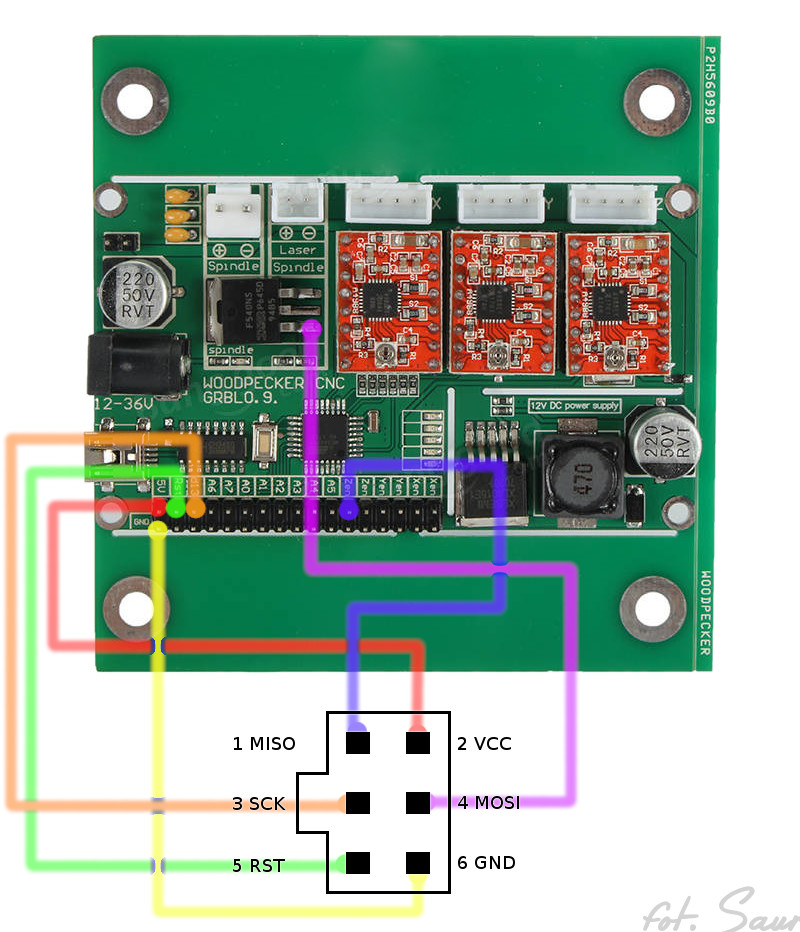
So to connect standard AVR programmer cable to Woodpecker, we need to prepare 6 wires. For older Woodpecker 0.9 (with 2 z-endstops) it should look like this (one, easy to do, soldering required):
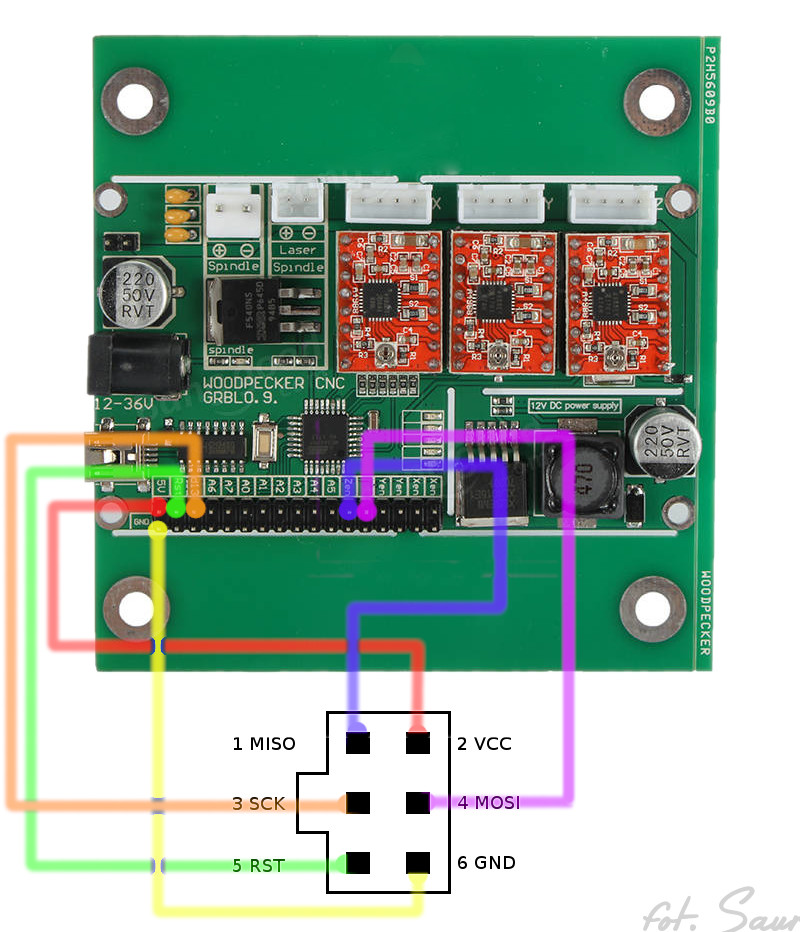
And for newer one (no need for soldering 🙂 ):
All that’s left is to use USB tiny (or any other – I have this one) programmer, and avrdude or Arduino IDE. Just select from the second, proper board (Arduino nano) and programmer (USBtinyISP).
Be aware, that burning bootloader will probably erase your GRBL device settings – so do the backup (just copy GRBL $$ output), it should not erase GRBL itself.
You do not have to choose proper port (USB tiny does not work over serial) and hit “Burn bootloader” – that’s it. To check, if everything went ok, just upload some tiny sketch with serial output (this will erase your GRBL!) – like “Communication” -> “ReadASCIIString”, and check the output over serial terminal.