Since DJI did something very strange and did not implement (or disabled) battery charging over USB-C build in Mavic Air, I did want to have other means of charging it during travel. On DJI forum there is a topic about some guy saying “he misses USB charging” and lot of crap from other people giving completely useless advice like “use car charger”, “buy car with 110V outlet” – whatever. For me this was completely valid point and I do want to travel with my Air not only by the car, power it from powerbank and have only one cellphone charger for all my devices.
Be warned – this is not an instruction how to do it, just some my insight on how it may work. If you destroy your battery or quad – it’s your fault.
Some theory…
Power plug pins
After this too long introduction, long story short, it looks like there is awfully simple way to do it. Since battery is called “smart”, and all modern batteries usually have most (if not all) of the charging/discharging logic build in, I assumed it’s going to be the same here. And it looks like there is. Quick multimeter test shows (and after looking on previous post about Mavic Pro batteries in the Internet) we have common ground and common +13V pins and two others (probably to read temperature, perhaps something more). And this also makes a lot of sense, since if charging logic would be in charger – it should have provide on output around 4V (depending if its LiIon or LiPo) for every cell in battery, since it outputs ~13V it can’t be “intelligent”.
Anyway, tests shows that all GND pins are connected together, ans so are also+13V pins (there are no separate lines). We can connect two wires from car 12V socket to farthest, opposite pins on Mavic battery and we have a crude 13V charger (car battery usually is around 13V – so this is all we need). Mavic nattery will drawn 3 amps and go down, as it gets charged.
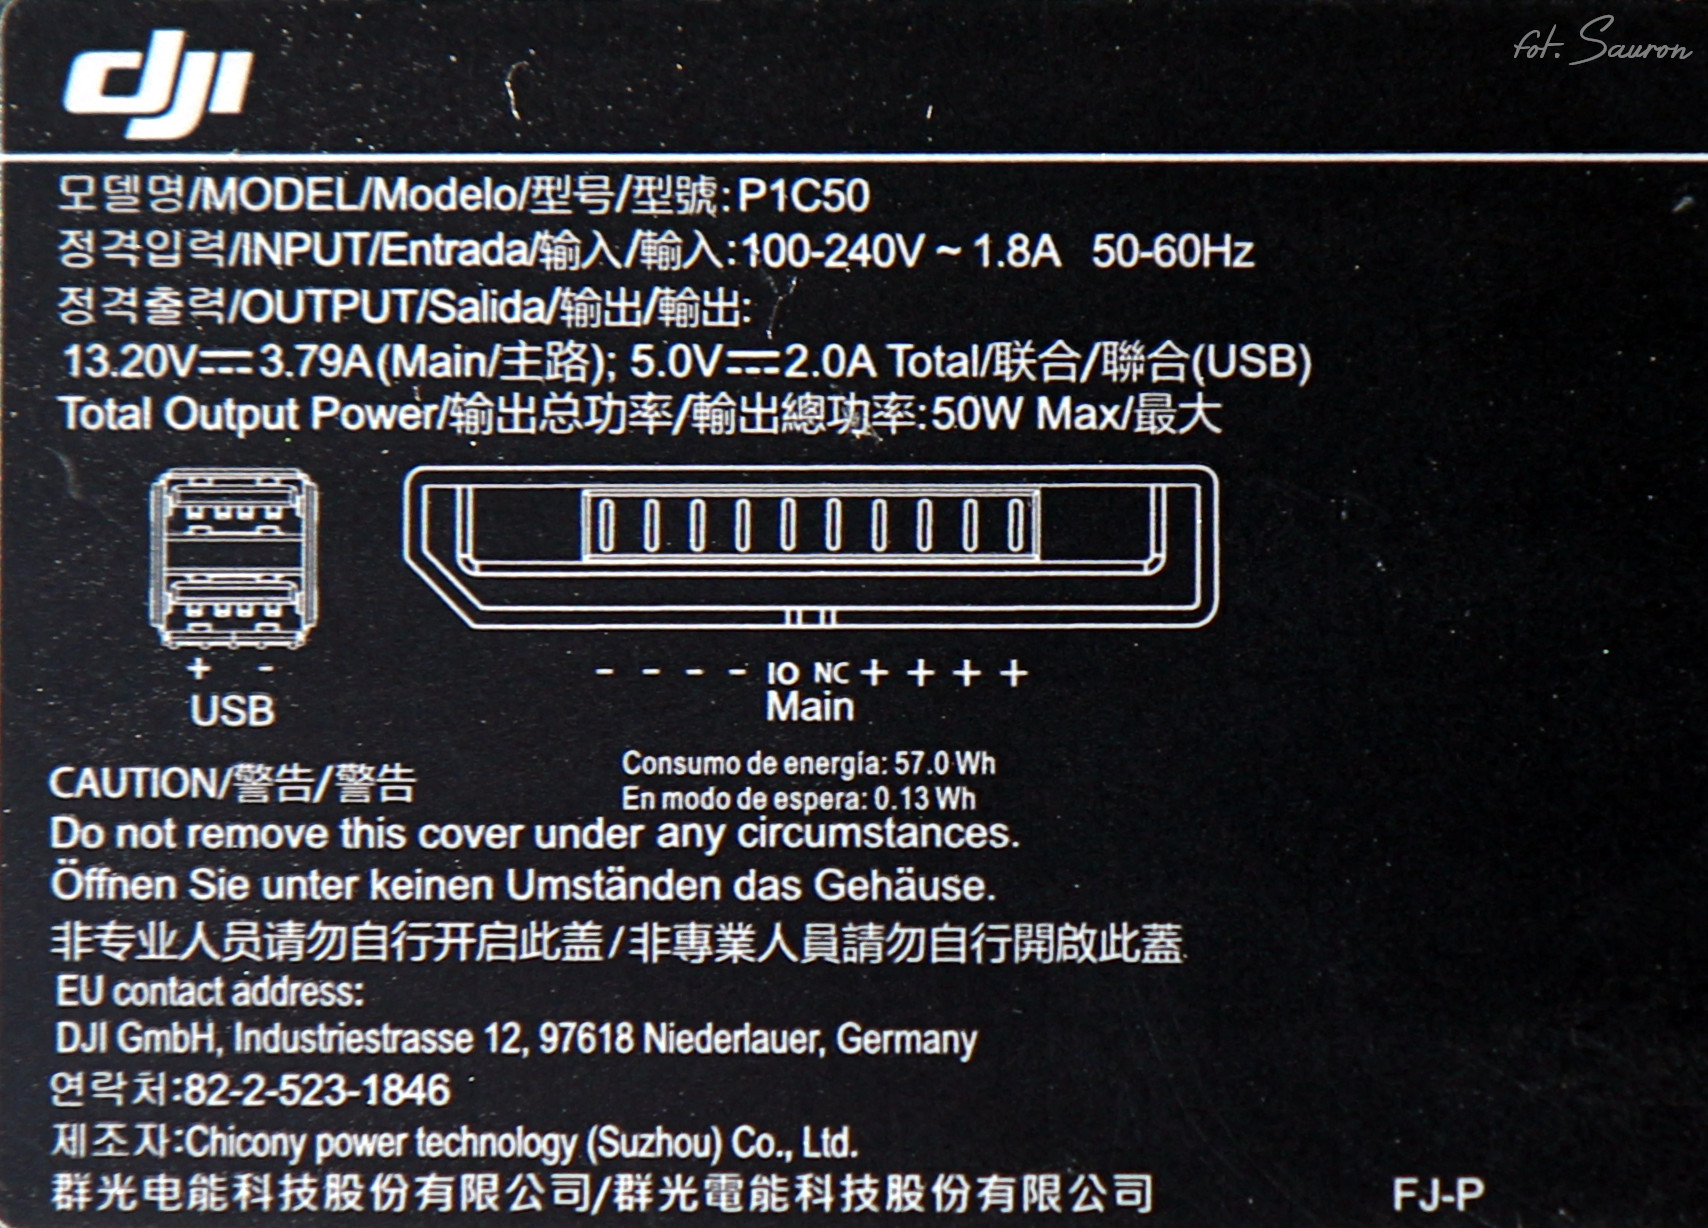
Update: Well it looks like it was enough to take a look at the Mavic charger to see what every pin in power plug does. But this was too simple 😉
Mavic Air charger description
So where does it leaves us? We can easily charge battery with car outlet socket, we can prepare boostup 5V-12,5V circuit to use standard USB charger… well perhaps not so standard – it will have to provide much more juice. Finally we can probably use fast charging cell phone power adapters (12V) – but this can be more tricky. But now I have to find a way to prepare proper socket instead those two wires 🙂
Some “proofs”
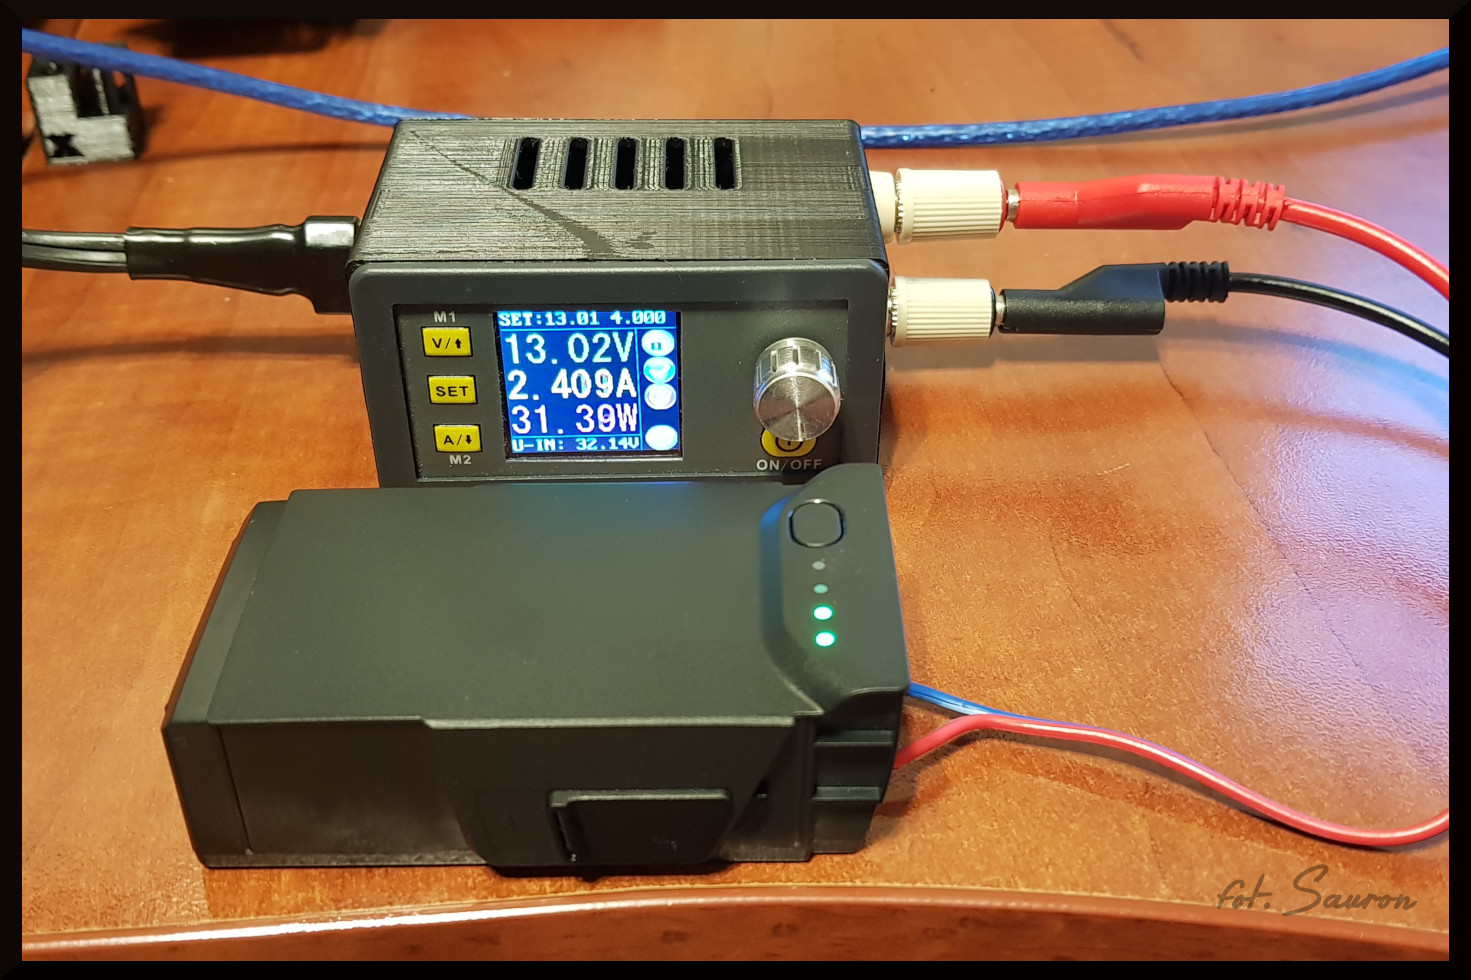
This is a video showing charging Mavic battery with bench power supply with 1A CC on beginning and 13V CV at the end.
Here you can see Mavic battery charging with DC-DC steup-up circuit powered with 1A, standard USB phone charger. Circuit was set for 13,5V output, but without load. Under load you can see 11,35V.
At this point it’s more an experiment, because with only 5W (1A*5V) charger it will take ages to charge 27,5W battery full (well, maybe more like 8h+). We should be able to do better, but all my “intelligent” phone chargers with QC/fast charging (depends if Samsung or Huawei) failed to start charging when device was just drawing current (“just” I mean without talking to them) – since my Air charger has no current limitation, probably initial spike made them powering off. Also it was not much better with powerbanks, most (if not all) of them where over-current and simply powered off.
Anyway, I managed to have 0,3A 13V output from 1A USB charger, a bit more 0,45A with other charger and the winner was 2A original Mavic charger (it has 2 USB ports). This 2A gave me around 0,8A of 13V, and this is already something. This also means that DC-DC convert is quite efficient 🙂
2A USB charger makes 0,75A 13V
So if you have “dumb” 2A USB charger you could charge Air battery in about 3-3,5h – I think this is acceptable. Sadly boost up circuit is getting quite hot, I’m not sure how long it will sustain this way. I’ve added a tiny heatsink, but for longer usage I should get better DC-DC converter.
Let’s do something real!
Ok, now few information you may need to create charger. To power it with car socket, you just need a DJI plug, two wires and, for easy of use, 12V car plug. To make USB charger, you will need additional DC-DC boost up converter, for 2$ – preferably better one, but simplest (I’ve used) will also do.
You will need The Plug…
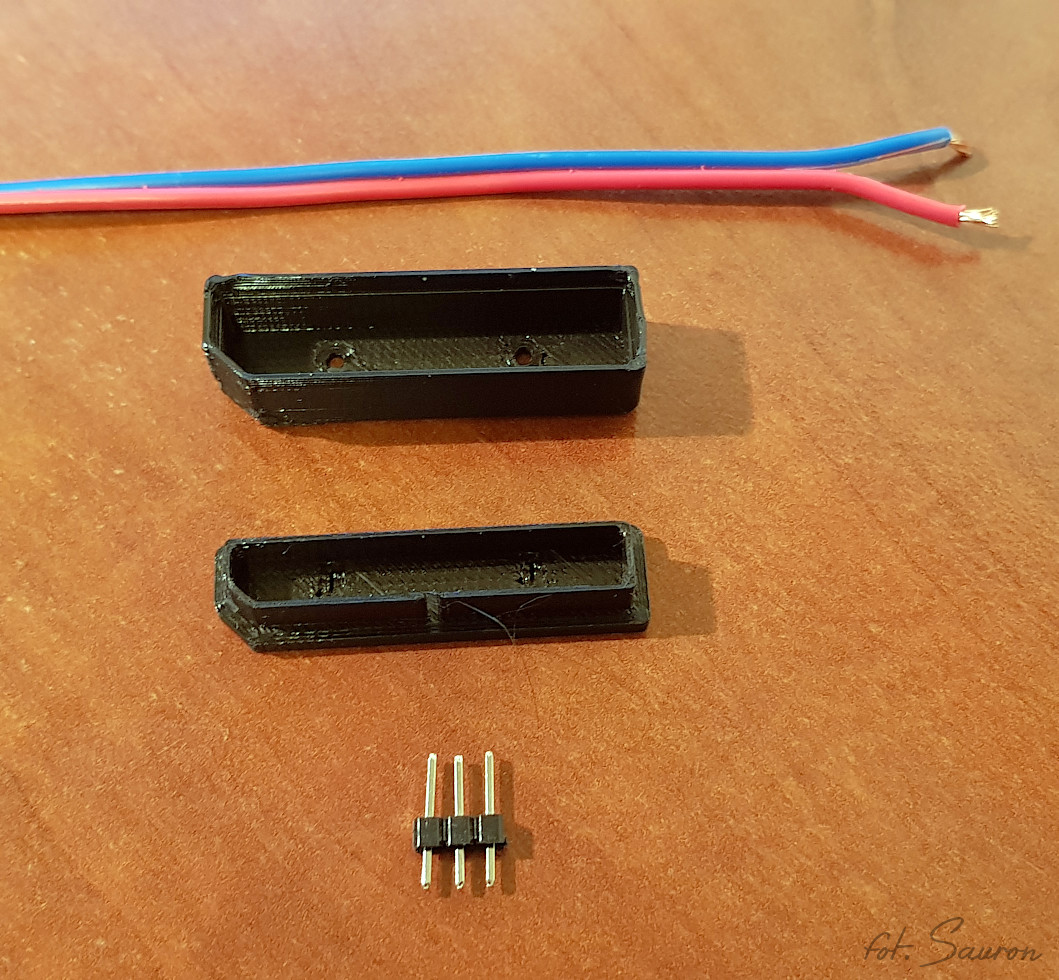
Printed Mavic Air power plug
That’s quite common problem ;)… I’ve created the model to print it – it works surprisingly well, even with those tiny walls. You should print it with 0,3mm (or smaller) nozzle and 0,2mm layers, without supports. You will also need two spare pins from a header row.
You will have to flatten pins a bit, I did it in vice, but strong hands and pliers will also do. As a last resort, you can hammer it a little :). You should do it on longer part, but plastic spacer is not needed, if you brake it. Holes in printed plug, are quite tight, but it’s better this way then the other. Flat holes you can widen with heating up pins and pushing through, round ones (for cable) – you have to use drill or knife.
Check if plug fits correctly in battery socket, if two parts of the plug can fit together (don’t snap it – not just yet!). If not – fix it with sharp knife.
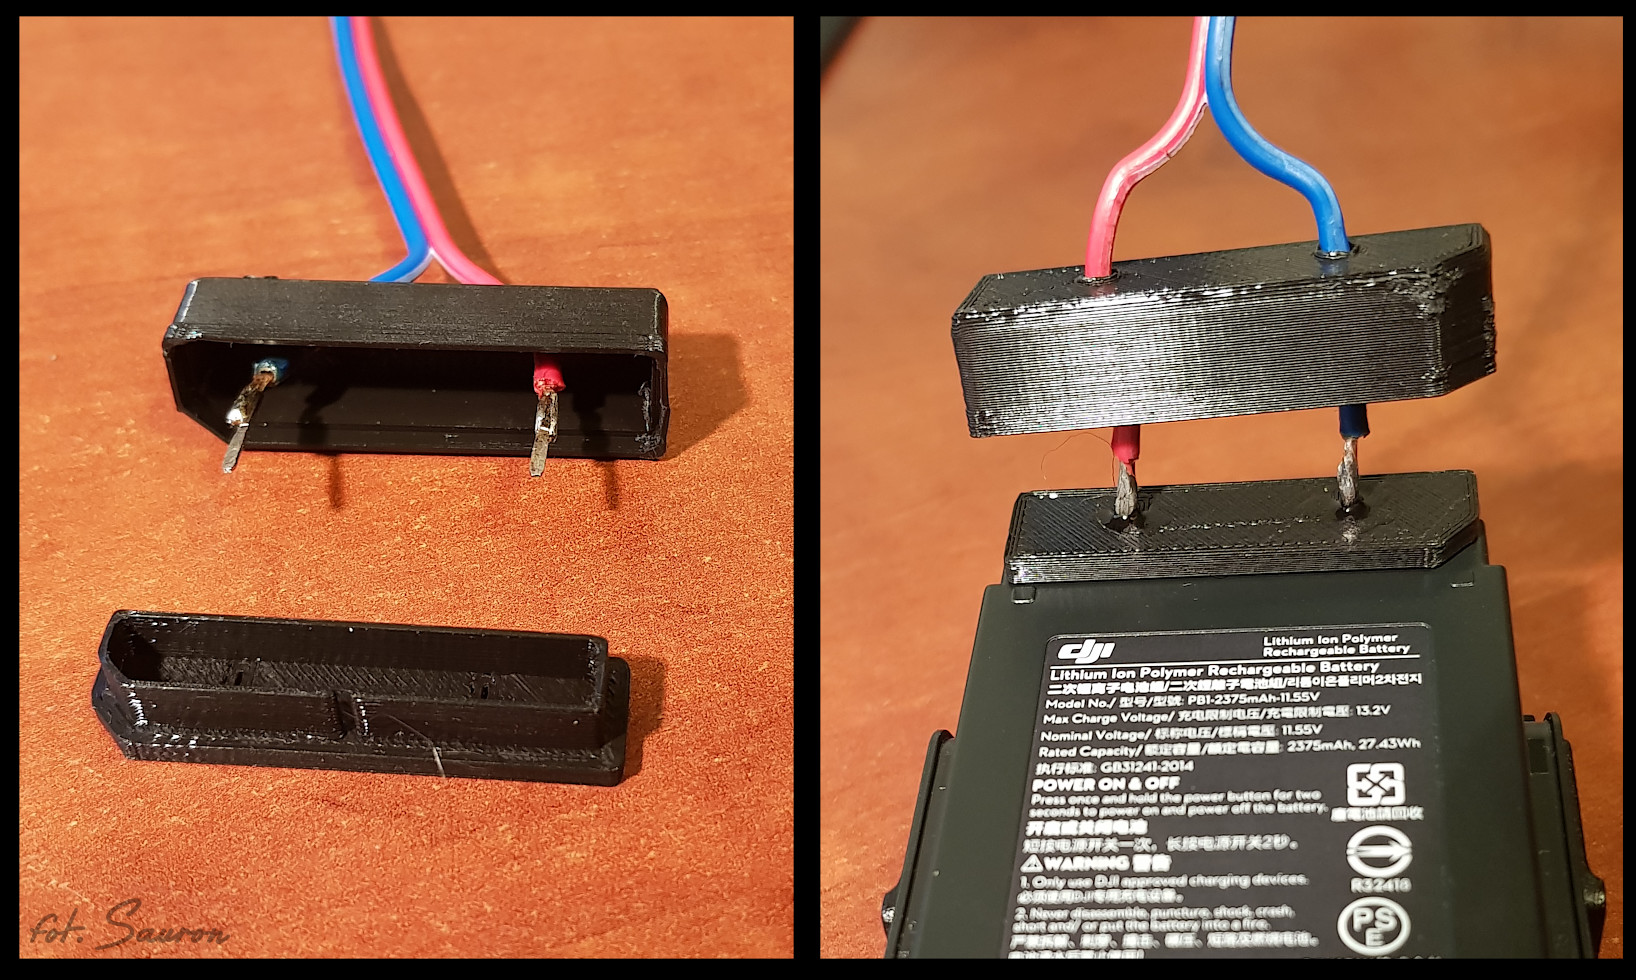
I recommend to solder first, then push pins and cables through both parts of the plug. Like on the picture below – left part of the photo.
Mavic AIr plug assembly
Next you should put the plug in to the battery socket, fit properly pins in battery socket slots and use CA glue to fix pins with printed case – see right part of assembly picture.
Finally just push two sockets parts together, or do it with a bit of hot glue inside – like I did – just in case 🙂
Step-up converter or 12V plug?
Next step is to decide whether you want to make USB or car charger. If it’s going to be car charger, you need 12V car lighter plug – and you have to connect it. This does not require any comments, so I just skip it – but remember about proper polarity (part of the plug with a notch is GND). Ideally we should use here some over current protection – just be on safe side (I’m not sure how well, and if, battery circuits will handle “infinite” car battery power) – I did test it, and it does not drawn more than 3,5A but… you know 🙂
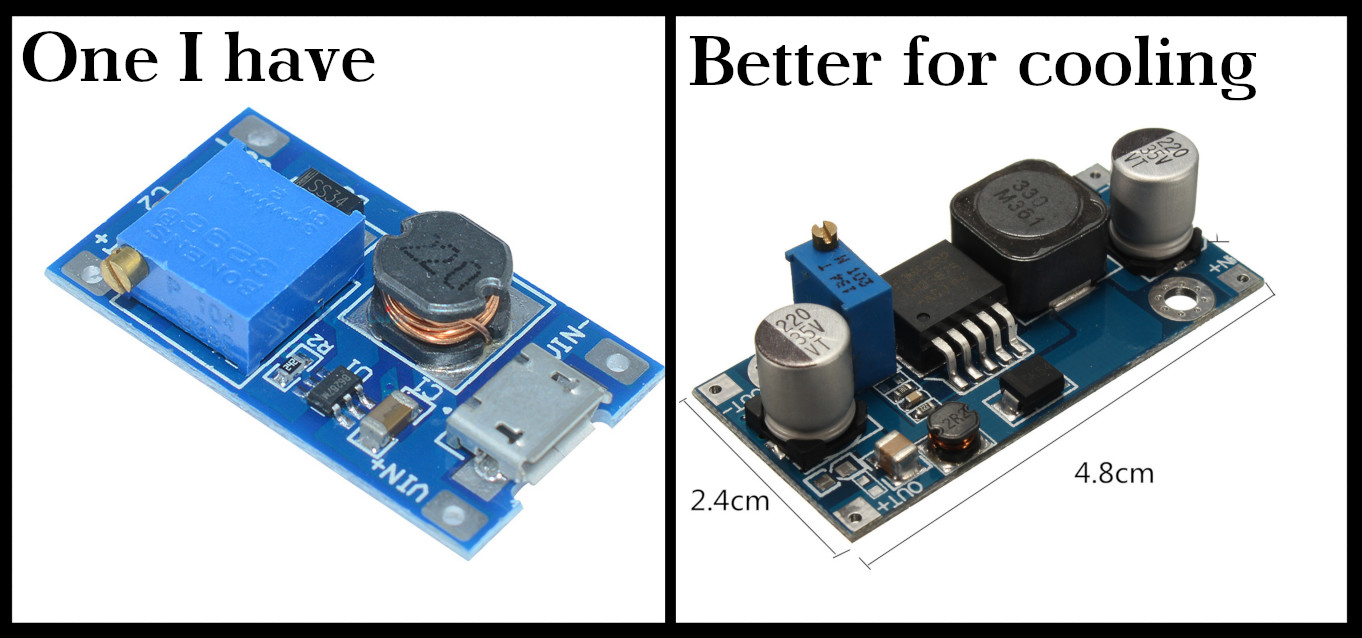
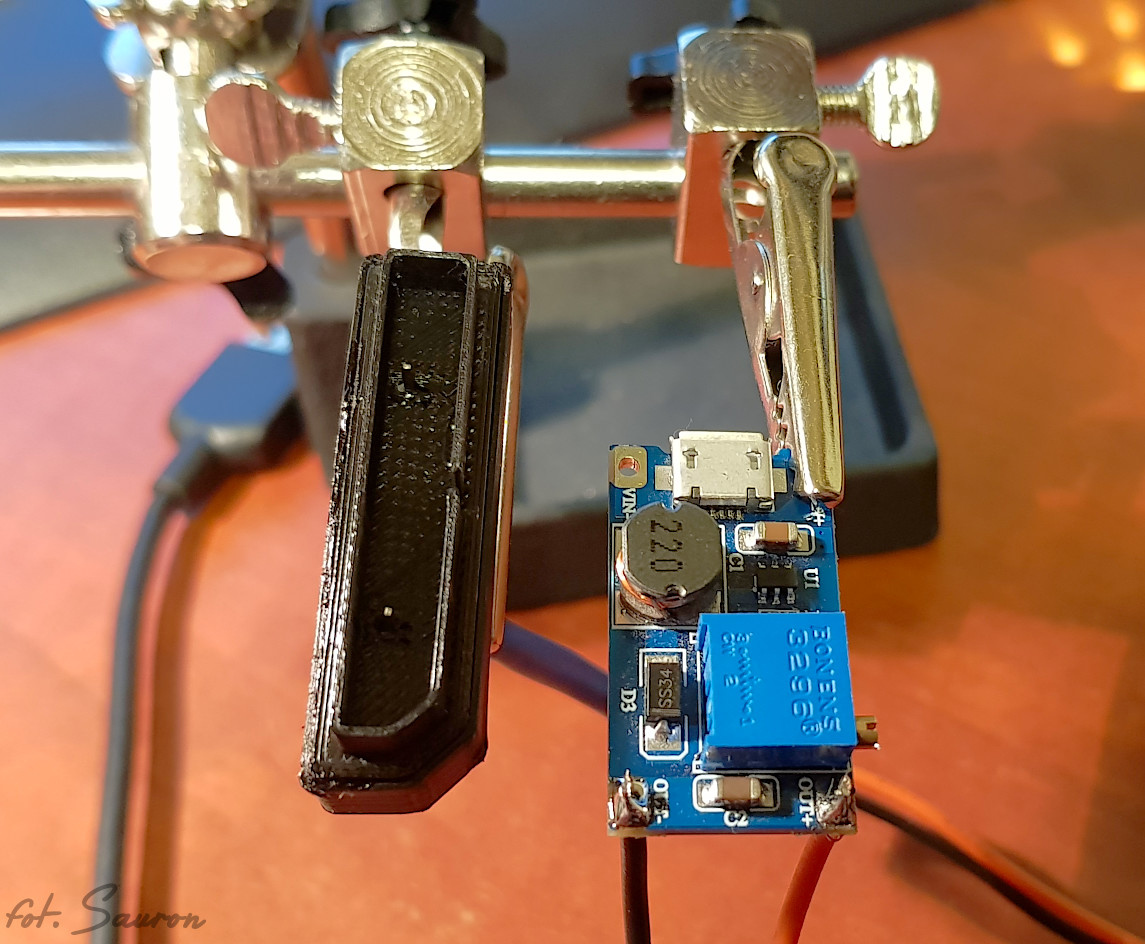
If you are going to prepare USB version, you will need mentioned DC-DC step-up converter. I used one I had in drawer, mostly because it already had micro USB socket. Biggest problem with this circuit is that is getting quite hot and because of a soldering points, it’s hard to add heatsink properly. There are other similar, that would be much easier with cooling (on the PCB side), but sadly without USB socket.
DC-DC step-up/boost circuits
Both are 2A output rated (probably more like 1A, with 2A current I guess they would melt down 😉 ), but still 1A output is less then we could have from 2A 5V cell phone charger/power bank. The ideal situation, would be to have circuit that can trigger QuickCharge/FastCharge and can output up to 4A. And totally awesome would be to have current limit, so we could use weak/trouble USB chargers – those that just turn off after drawing too much power.
And that’s it. Cover your step-up converter in some case (or shrinking tube if you are brave enough) and use it.
What next?
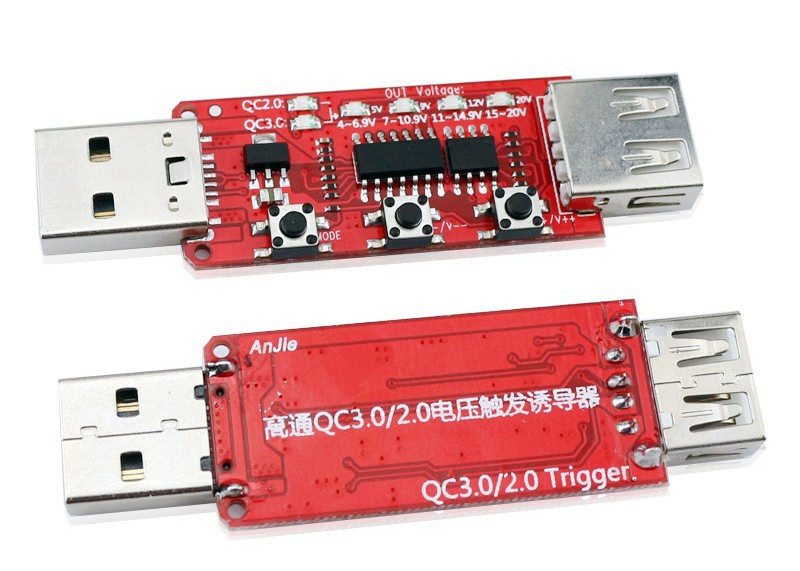
I’ll add next QuickCharge 2.0/3.0 trigger in-line. I don’t know if it’s going to be Arduino trigger (here is required knowledge), or I just by board like this bellow and assume it’s done 🙂
Qualcomm Quick Charge trigger/tester
Update
Small update after a week of using both chargers on the boat. They work – that’s a good news 🙂
12V charger is of course faster, but from what I could observer it requires at least 12,4V to charger battery and less then 13,5V – otherwise it will trigger battery overcharge protection. So improvement here, would be some kind of voltage stabilizer. Haven’t found anything cheap – car stuff is 20$+, but I guess I could use step-up and step-down circuits to stabilize it around 13V.
USB charger is also working well (but slow) and there are not so many powerbanks or chargers that will work properly with it. Like I wrote before, most of the devices will shutdown itself, if our battery charger will drawn more then charger can handle. So you have to find working device, for me it was cheap, Chinese 8 x 18650 DYI powerbank or more expensive suitable of providing 2,4A of current. So next we should find some good way to limit current to 2A (perhaps QI charger will do it by itself – we’ll see).
Update 2 (20.07.2018)
I’ve prepared new plug (Thingiverse), that is more snug and at angle – just to make it more reliable and easier to charge “on road”. Last one was falling off, when I was charging Mavic in bags during bicycle raid 🙂
Great write up, even years later its still valid. Im planning to follow your steps but use usb-c PD trigger it either to 14V or 20V and then step-down it to 13.3V.
My question is, does it work fine if we provide it with 2/3A instead of the full 3.79 something that the original charger provides (except longer charge time of course)
Well, with new PD you don’t have to do any step-down/ups. With PD 3.1 you can demand required voltage with accuracy of 0,1V – so you can set it to 13,3V and call it done. You will have to find good PD trigger board and charger/power bank that works with PD 3.1 and PPS or AVS feature. And you don’t have to worry with smaller current – it will just charge longer.
I didn’t even know that USB PD has PPS/AWS protocols, thank you!!
Sadly, currently there are only 2 commercially available triggers that will ship to Europe, the cost of each + shipping is more than double of 2 “normal” triggers and buck converters. While this will allow me to plug an play, the other option will allow me to charge 2 batteries from the same power bank for the same cost.
Im using an Ugreen power bank with only 1 PPS output.
We use cookies to ensure that we give you the best experience on our website. If you continue to use this site we will assume that you are happy with it.
 Since DJI did something very strange and did not implement (or disabled) battery charging over USB-C build in Mavic Air, I did want to have other means of charging it during travel. On DJI forum there is a topic about some guy saying “he misses USB charging” and lot of crap from other people giving completely useless advice like “use car charger”, “buy car with 110V outlet” – whatever. For me this was completely valid point and I do want to travel with my Air not only by the car, power it from powerbank and have only one cellphone charger for all my devices.
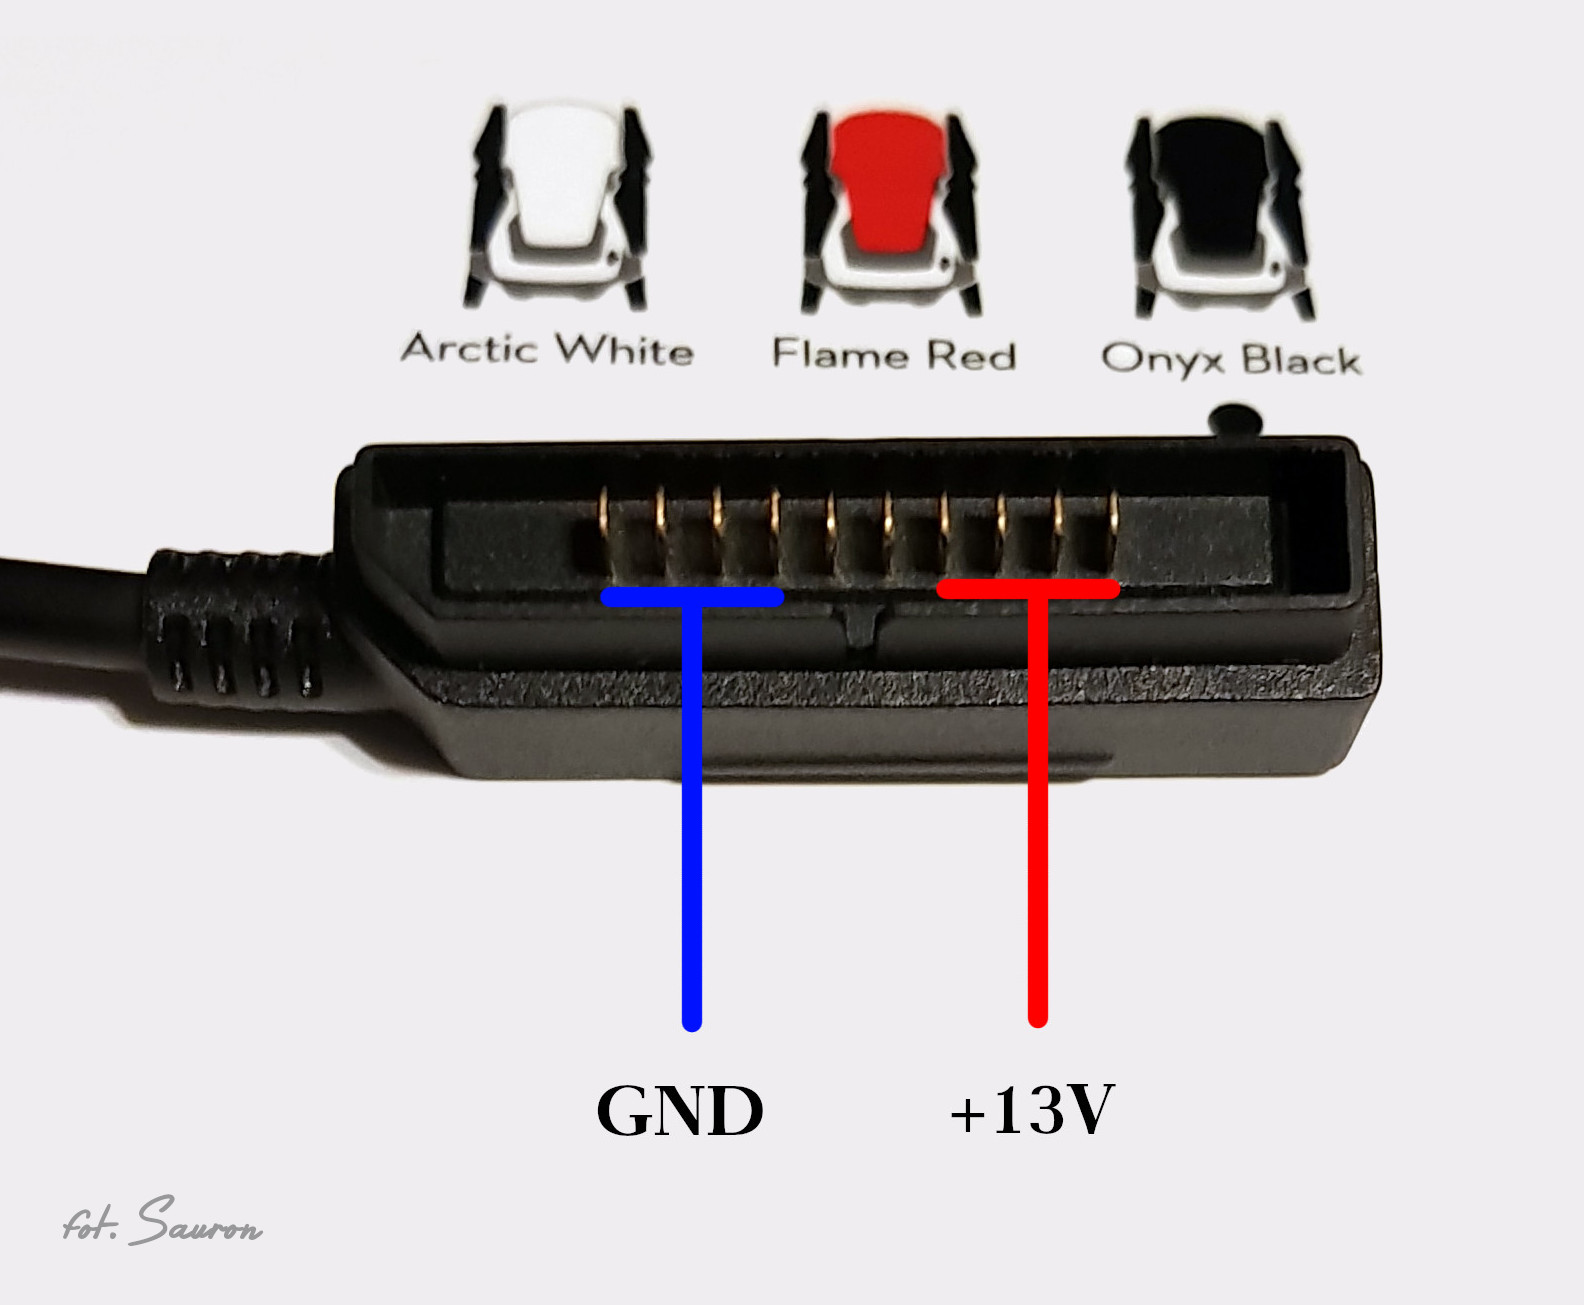
 At this point it’s more an experiment, because with only 5W (1A*5V) charger it will take ages to charge 27,5W battery full (well, maybe more like 8h+). We should be able to do better, but all my “intelligent” phone chargers with QC/fast charging (depends if Samsung or Huawei) failed to start charging when device was just drawing current (“just” I mean without talking to them) – since my Air charger has no current limitation, probably initial spike made them powering off. Also it was not much better with powerbanks, most (if not all) of them where over-current and simply powered off.
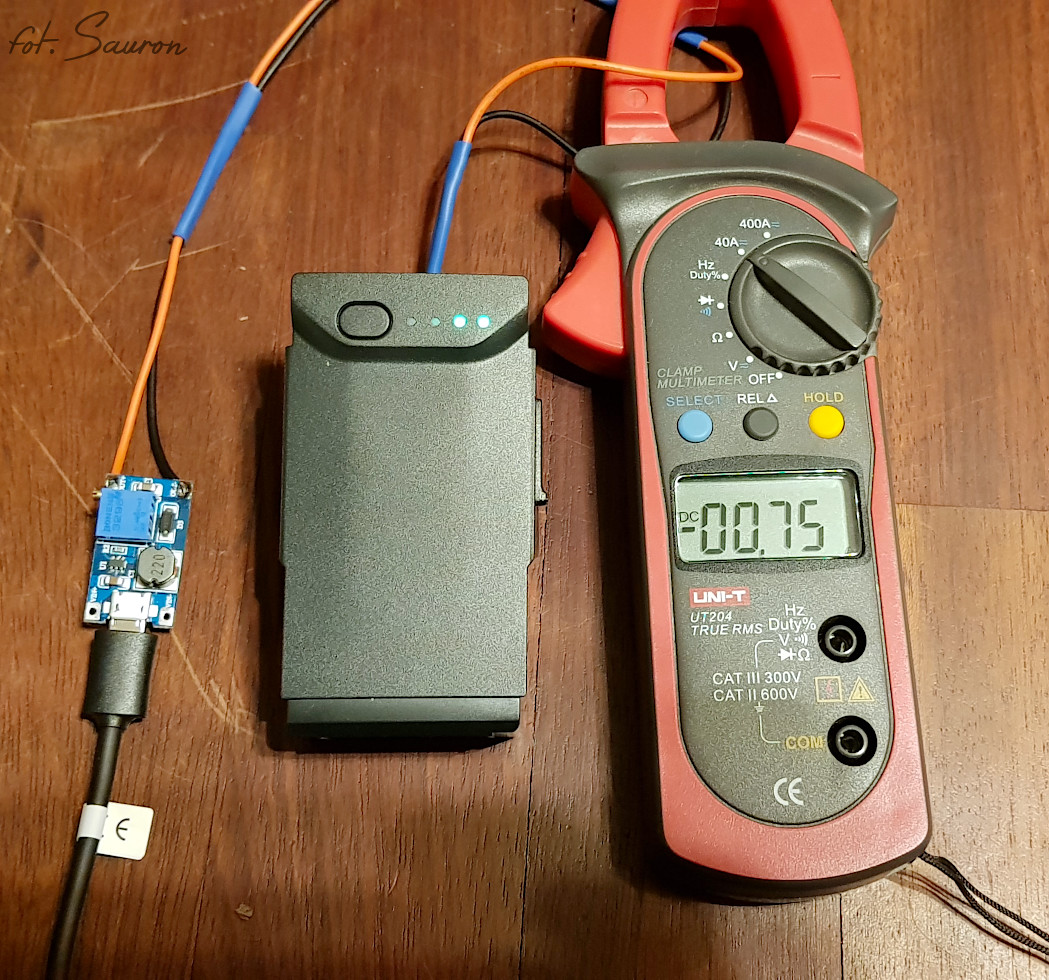
Super. THX.
Thank you!
Nice! Very usefull!
Great write up, even years later its still valid. Im planning to follow your steps but use usb-c PD trigger it either to 14V or 20V and then step-down it to 13.3V.
My question is, does it work fine if we provide it with 2/3A instead of the full 3.79 something that the original charger provides (except longer charge time of course)
Well, with new PD you don’t have to do any step-down/ups. With PD 3.1 you can demand required voltage with accuracy of 0,1V – so you can set it to 13,3V and call it done. You will have to find good PD trigger board and charger/power bank that works with PD 3.1 and PPS or AVS feature. And you don’t have to worry with smaller current – it will just charge longer.
I didn’t even know that USB PD has PPS/AWS protocols, thank you!!
Sadly, currently there are only 2 commercially available triggers that will ship to Europe, the cost of each + shipping is more than double of 2 “normal” triggers and buck converters. While this will allow me to plug an play, the other option will allow me to charge 2 batteries from the same power bank for the same cost.
Im using an Ugreen power bank with only 1 PPS output.